 |
 |
 |
Monday, October 31, 2005
Posted 7:54 AM
Initial Thoughts on My New PowerBook G4
Trick or treat! For me, the last few days have been a treat: my new 15-inch PowerBook G4 arrived on Friday. And I'm in love.
Herewith, a few initial thoughts about my newest technology fling.
Screen test. One of the things that excited me about the new 15-inch PowerBook is its higher-resolution screen: at 1440 by 960, its pixel count matches that of the old 17-inch PowerBook.
But shoehorning more pixels into the same amount of space means that everything on the screen is smaller. My 40-something eyes were a little concerned about readability, but their fears were unfounded. The new display is crisp, bright, and eminently legible.
Sound check. I was also attracted by the digital audio input and output of the new 15-inch PowerBook -- another capability that was previously available only in the 17-inch model. I haven't connected the computer to any DAT recorders or other digital I/O devices yet, but I plan to.
On Macintouch, one reader queried: "Just wonder if you or any reader might know how the digital audio in and out on the new DL Powerbooks might work. Is it just the mini-toslink cable like the airport express uses?" Here's the scoop, straight from the PowerBook's manual: "The headphone port is also a S/PDIF stereo 3.5 mini-phono jack....The audio line in port is also a S/PDIF stereo 3.5 mini-phono jack...Using a Toslink jack-to-miniplug adapter, you can use a Toslink cable to connect Digital Audio Tape (DAT) decks or digital instruments to input and mix your own music."
Drive times. As I mentioned last week, when I ordered my PowerBook from Apple's online store, I upgraded to the 100GB, 7200-rpm hard drive. This computer will be doing a lot of GarageBand, video, and audio duties, and I wanted a faster drive than the stock 5400-rpm drive. (The extra 20GB won't hurt, either.)
According to the Xbench utility, the extra $200 pays off. My PowerBook's drive, a Seagate Momentus, is showing read and write times that are up to twice as fast as the stock 80GB Hitachi drive.
You can compare my PowerBook's performance with others'.
Cool thighs. One friend was curious about whether the faster drive would cause the PowerBook to run hot. I'd say no—my PowerBook is running comfortably cool.
And there you have it: the happy glow of a new relationship. I have a 2GB memory upgrade on order from Crucial, and have ordered an STM Rebound case. I also have some dual layer DVD+R blanks on the way.
Do I wish the PowerBook ran at 2Ghz? No. I wish it ran at 20Ghz. But I needed a new portable now (or so I convinced myself), and the improvements that Apple added to the 15-inch model—the high-resolution screen, faster DDR2 memory, dual-layer SuperDrive, longer battery life, digital audio I/O, and lower price—were enough to make me get out my credit card.
This is going to be fun.
Thursday, October 27, 2005
Posted 9:25 AM
Mac Miscellany: EyeTV to iPod Export, Creating Books in Aperture, Fluid Mask for Photoshop, and Travels with My New PowerBook
Grab your bag, because here comes a grab bag of items.
My EyeTV export instructions don't work. So say a couple of correspondents. As I mentioned in my post of October 14, I don't have a fifth-generation (5G) iPod yet, and I got those instructions from the folks at Elgato Systems—and they didn't have a 5G iPod at the time, either.
As they might say in Berkeley, it was a case of the visually impaired individual leading the visually impaired individual.
Elgato Systems has posted a vague tech support blurb on its site, but it isn't all that useful. Here's hoping the promised EyeTV software update with direct iPod support arrives soon.
In the meantime, my 5G iPod-owning friends, I ask: Have you tried the Automator action that I wrote about last week? That might do the trick. I don't have a 5G iPod yet, so I remain visually impaired. Or video-impaired. Or both.
Aperture will print high-resolution books. With iPhoto, you can, too. According to a reader comment on Macintouch, the book-layout features in Apple's forthcoming Aperture imaging program will print images at a resolution of 300 dots per inch.
That's twice the resolution used for most iPhoto book formats. (iPhoto prints the small, pocket-sized books at 300 dpi, but all other sizes print at 150 dpi.) Apple's own tech specs page for Aperture does indeed tout "high-resolution book printing," so that seems to validate the Macintouch reader's comment.
But remember, iPhoto users: you can hack iPhoto's preferences file to enable 300-dpi printing. Instructions here.
Masking made (a little) easier. I'm reviewing a Photoshop plug-in for Macworld called Fluid Mask. It's designed to simplify the arduous process of creating masks and cut-outs in Photoshop.
I've posted one of my experiments on Flickr; I'll link to my review when it appears on Macworld.com.
A new baby on the way. After a few years of slogging along with a 667Mhz PowerBook G4, I took the plunge and ordered a new 15-inch PowerBook G4 last week. I was waiting for Apple to bump up the processor speed (weren't we all?!), but my old Titanium is gasping for life and I have a big trip coming up in December, so it was time.
I did the build-to-order thing, upgrading to the 100GB, 7200-rpm hard drive. With disk-intensive programs, 5400-rpm laptop hard drives can be the weak link in the performance chain, and the 7200-rpm drive should give a nice performance boost. It should really help with GarageBand multitracking.
According to FedEx, my PowerBook shipped from Shanghai a couple of days ago, and after taking in the sights in Anchorage, Alaska, it decided to jet over to Indianapolis, Indiana before heading west to Northern California.
I'll update you on its travels next week.
Wednesday, October 19, 2005
Posted 10:29 AM
Say Hello to Aperture (and Yes, it Supports Automator)
Well, well! Today at the PhotoPlus Expo in New York, Apple announced Aperture, a digital image manipulation program aimed at advanced photographers.
Aperture's interface looks gorgeous. Suddenly, Photoshop looks so...twentieth century.
Aperture also appears to borrow from, and work with, iPhoto: you can access an iPhoto library directly within Aperture, and you can organize photos into albums and smart albums. You can even use Aperture to create photo Web pages and books.
Aperture appears to work with Adobe Photoshop, though it's not immediately clear to me how the two programs might mesh, since Apple's tech specs page says that Aperture supports only flattened (not layered) Photoshop files.
Aperture ships in November; rest assured I'll be saying more about this exciting new program in the weeks to come.
Oh, and one more thing: Aperture supports Tiger's Automator technology. Aperture will include a set of Automator actions that handle common chores.
Tuesday, October 18, 2005
Posted 8:37 AM
Exporting Video for an iPod with QuickTime 7.0.3
Er, make that "to a fifth-generation iPod," to use Apple's official lingo.
What do you know? If you install QuickTime 7.0.3, you get a preset, named "Movie to iPod (320 by 240)", for exporting video to a video-capable iPod. It works in iMovie HD, QuickTime Player Pro, and presumably, any program that can export QuickTime movies.
Using it is a cinch: choose your video program's Export or Share command, then choose the "Movie to iPod (320 by 240)" preset and name your movie. Add the result to iTunes 6, sync with your iPod, and watch.
With that preset, you don't have the option to tweak video-compression settings. To do that, you'll need to follow steps similar to those I outlined the other day.
You'll find more details in this Apple support document.
Updated Tuesday afternoon.
Monday, October 17, 2005
Posted 8:21 AM
Now Available for Tiger: An Automator Action for Prepping iPod Video
Now available for downloading: an Automator action that preps video for that shiny new video iPod of yours.
To quote from the download page: "This action uses the QuickTime Player application to export an "iPod-ready" version of the movie files passed from the previous action. The name of an exported file is based on the name of its source file. This action requires QuickTime Pro 7.0.3 or higher and accepts ".mov" and ".dv" files as source. Options exist for exporting the files to the same directory as the source files and for replacing any existing files with the same name. Additionally, source files can be deleted after export."
Now that's more like it.
Friday, October 14, 2005
Posted 11:13 AM
How to Convert Your EyeTV Recordings for a Video iPod
Bought any episodes of Desperate Housewives yet? Me neither. Don't get me wrong: I think Apple's toe in waters of downloadable video sparkles with brilliance. I just think Marcia Cross deserves more than a 2.5-inch screen.
While the pundits prattle about whether there's a market for pay-to-squint music videos, I'm thinking about other forms of video. When I get my video iPod, I'm going to want to rip DVDs to it. And I'm going to want to stash and carry video that I've recorded using Elgato Systems' EyeTV system.
The DVD-ripping part of the equation will be interesting. The universally loved Digital Millennium Copyright Act outlaws programs that would enable us to rip a DVD into the H.264 format used by new iPods. There are programs that can rip DVDs, but converting that content into H.264 format is cumbersome. (Instructions here.) The good news, of course, is that programmers will work around these limitations, and it won't be long before you'll be able to watch Harry Potter on your pod.
The EyeTV Angle
Video from an EyeTV is a happier story. The terrific EyeTV software can already export video into a variety of formats, including H.264. And sometime next month, an Elgato representative tells me, the company will release an update that will provide a preset for iPod video -- and will even provide an option to automatically add the exported video to iTunes 6.
In the meantime, you can export EyeTV video for an iPod without too much work -- and you don't even have to own QuickTime Pro in order to do so.
Here's the process, direct from the folks at El Gato.
Step 1. In EyeTV, choose Export from the File menu.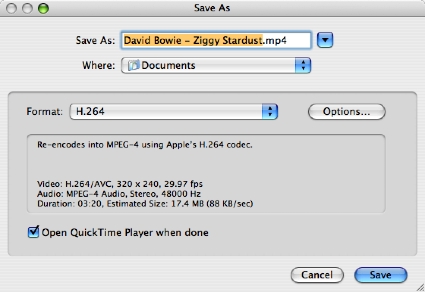
Step 2. From the Formats pop-up menu, choose H.264.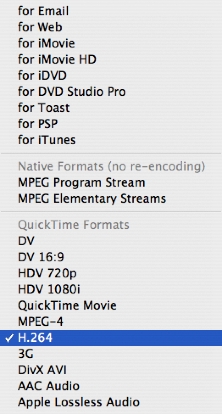
Step 3. Click the Options button, then set up the dialog box as shown below. (For video in PAL format, choose 25 as the frame rate. If you're converting 16:9 widescreen video, choose Custom from the Image Size pop-up menu, then enter 320 x 180.)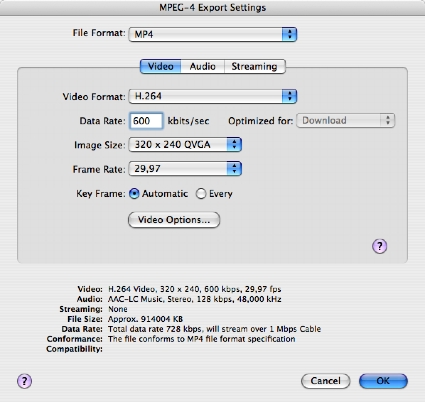
Step 4. While still working in the MPEG-4 Export Settings dialog box, click the Video Options button. In the dialog box that appears, check the Baseline box.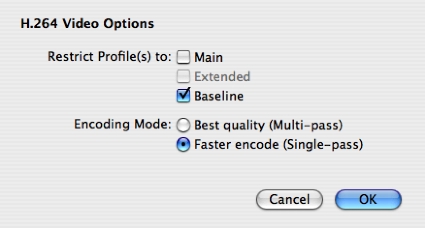
Step 5. Click OK a couple of times and wait for the EyeTV software to do its thing. Then add the resulting video to iTunes 6 and sync up.
The EyeTV folks provide a disclaimer: they don't yet have a video-capable iPod, and these instructions are based on their analysis of the new iPod's video specifications. But it ought to work.
One More Thing
Just one last thing. Apple claims that the iTunes 6 experience is identical on Macs and Windows. However, sources within the company have told me that Desperate Housewives are, in fact, more desperate when using Microsoft Windows, and episodes of Lost are, in fact, easier to lose.
I jest, of course. Have a great weekend!
One more "one more thing." The world's best-selling iLife book is still on sale at Amazon. A gorgeous, full-color guide to all five iLife programs and a two-hour, 43-minute instructional DVD that's also packed with iTunes AppleScripts, GarageBand loops, sample files, and much more. The Macintosh iLife '05 has a cover price of $34.99, but it's yours on Amazon for $23.09—34 percent off. Learn more about what one reviewer called "the best computer book ever, bar none." Then order yours.
Tuesday, October 04, 2005
Posted 8:32 AM
Use Tiger? Add Some Image Tricks to Your Photos
I had a great time at the Mac Computer Expo in Santa Rosa last Saturday. It was a gorgeous day for a drive (I live a couple of hours north of Santa Rosa), there was a good crowd, and I saw many friendly and familiar faces. In all, it was a great antidote for the doldrums that I've been floating in lately.
My seminar topic was called "iLife in the Land of Tiger," and was a collection of Tiger-related iLife tips. As part of my talk, I showed several Tiger-only programs that enhance iLife in one way or another, and one of them is a very cool piece of freeware that you must try.
Image Tricks or Treats
The program is BeLight Software's Image Tricks, and it lets you easy modify and stylize photos in a variety of fun ways.
Drag a photo into the Image Tricks window, and you can apply over 35 filters and effects to it. You can also add any of 30 mask designs to the image—to create artsy borders, for example.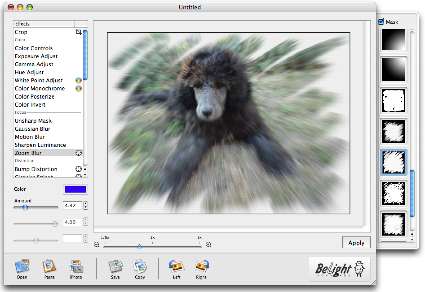
In the example above, I've added the Zoom Blur effect and a mask.
Image Tricks taps into Tiger's CoreImage, a set of graphics-processing routines that is built into Tiger.
There's room for improvement. On older G4 Macs, Image Tricks runs sluggishly (but then, what doesn't?). And although BeLight Software touts Image Tricks' iPhoto integration, the two programs don't work together as smoothly as they could. When you drag a photo from iPhoto into Image Tricks, it opens as an untitled document, which makes it cumbersome to use your "tricked-out" photo in iPhoto: instead of just being able to use the Save command, you must save the image in a separate location (such as on your desktop), and then drag it into iPhoto.
But you can't argue with the price. If you use Tiger, you'll want to try out this fun and free program. Go download it now.
And while you're online... Grab yourself a copy of the world's best-selling iLife book. With The Macintosh iLife '05, you get 345 gorgeous, full-color pages and a two-hour, 43-minute instructional DVD. Learn more and watch samples from the DVD, then order your copy for just $23.09—34 percent off the cover price.
April 2003
May 2003
June 2003
July 2003
August 2003
October 2003
November 2003
December 2003
January 2004
February 2004
March 2004
April 2004
May 2004
June 2004
July 2004
August 2004
September 2004
October 2004
November 2004
December 2004
January 2005
February 2005
March 2005
April 2005
May 2005
June 2005
July 2005
August 2005
September 2005
October 2005
November 2005
December 2005
January 2006
February 2006
April 2006
May 2006
June 2006
Really old stuff (before February 2003)


